發表文章

目前顯示的是有「ubuntu」標籤的文章

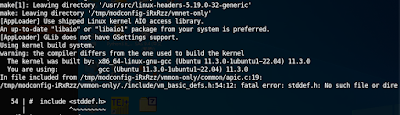
VMware workstation pro 16.2.5 with Kernel 5.19.0-32-generic Ubuntu 22.04.1

圖片
#when vmmon and vmnet error # git clone https://gitub.com/mkubecek/vmware-host/modules.git cd vmware-host-modules git checkout workstation-16.2.5 sudo make sudo make install sudo systemctl restart vmware references  https://github.com/mkubecek/vmware-host-modules

Installing VMware workstation pro on Ubuntu 22.X (Jammy Jellyfish)

圖片
 1. Download workstation pro for vmware website https://www.vmware.com/tw/products/workstation-pro/workstation-pro-evaluation.html e.g.  VMware-Workstation-Full-16.2.3-19376536.x86_64.bundle 2. Download modules patch from github https://github.com/mkubecek/vmware-host-modules/releases/tag/w16.2.3-k5.18 tarball https://github.com/mkubecek/vmware-host-modules/archive/refs/tags/w16.2.3-k5.18.tar.gz 3. Execute by sudo $ chmod 755 VMware-Workstation-Full-16.2.3-19376536.x86_64.bundle $ sudo apt-get -y install build-essential $ sudo VMware-Workstation-Full-16.2.3-19376536.x86_64.bundle 4.Execude by account $ vmware 5. patch vmmon and vmnet $ tar zxvf w16.2.3-k5.18.tar.gz  $ cd  vmware-host-modules-w16.2.3-k5.18 $ tar cvf vmnet.tar  vmnet-only && sudo cp vmnet.tar /usr/lib/vmware/modules/source/ $ tar cvf vmmon.tar vmmon-only && sudo cp vmmon.tar /usr/lib/vmware/modules/source/ $ sudo vmware-modconfig --console --install-all         ...

Reset mysql 8 password on Ubuntu 20

 1.  $ sudo systemctl stop mysql $ sudo mkdir  /var/run/mysqld; sudo chown mysql /var/run/mysqld 2. $ mysqld_safe --skip-grant-tables & $ mysql --user=root mysql 3. -> update mysql.user set authentication_string=null where user='root';

Install vmware workstation pro after normal installation of Ubuntu 20.X

After minial installation or normal installation of Ubuntu  1. update repository and upgrade packages from apt command $ sudo apt update $ sudo apt upgrade $ sudo reboot 2.  install build-essential for library vmware needed to compile $ sudo apt install build-essential $ sudo apt install dkms 3 . download vmware workstation from website as https://www.vmware.com/go/getworkstation-linux 4. $  chmod 755 VMware-Workstation-Full-16.2.3-19376536.x86_64.bundle   # latest version $ cd ~/Download; sudo ./VMware-Workstation-Full-16.2.3-19376536.x86_64.bundle $ vmware &   # or search vmware from gnome and click app to execute

Disable nouveau and install NVIDIA Driver on Ubuntu

圖片
1. Download NVIDIA from  https://www.nvidia.com/Download/index.aspx?ncid=afm-chs-44270&ranMID=44270&ranEAID=a1LgFw09t88&ranSiteID=a1LgFw09t88-buxlbcTUvQEV.eZv3z3a3g if driver is in  https://www.nvidia.com/Download/driverResults.aspx/184163/en-us , driver filename is NVIDIA-Linux-x86_64-470.94.run 2. download make, gcc, dkms  and vim from apt-get $ apt install gcc make vim libglvnd-* 3. touch and edit /etc/modprobe.d/blacklist-nouveau.conf to add below content blacklist nouveau options nouveau modset=0 4. run update-initramfs command $ sudo update-initramfs -u 5. change boot target and reboot to multi-user.target by command systemctl $ sudo systemctl set-default multi-user.target $ sudo systemctl reboot 6. enable execuate driver file  NVIDIA-Linux-x86_64-470.94.run and run it $ cd ~/Download $ sudo chmod 755 NVIDIA-Linux-x86_64-470.94 $ sudo ./NVIDIA-Linux-x86_64-470.94 --dkms 7. add min/max icon https://itsfoss.com/click-to-minimize-ubuntu/ gsettings set...
Add new language and typing on Ubuntu 20.04 LTS (Focal Fossa)

圖片
1. Press Ctrl + Alt + T to open terminal 2. apt-get install ibus-zhuyin ibus-pinyin ibus-chewing or apt-get install ibus-*                       3. logout and login again (p.s. maybe run startx command to start x-window) 4. setting -> Region & Language 5. click + upon Manage Installed Languages 3. Choose Install / Remove Languages                         reference https://askubuntu.com/questions/59356/how-do-i-get-chinese-input-to-work https://www.programmersought.com/article/22294071374/

Install Nvidia Driver on Ubuntu 20.04 LTS(Focal Fossa)

圖片
 1. Download NV Driver form https://www.nvidia.com/Download/index.aspx?lang=en-us 2. Install development tools $ sudo apt-get update $ sudo apt-get install build-essential libglvnd-* 3. Install make  $ sudo apt-get install ubuntu-make 4. Execute and compile driver binary (eg. NVIDIA-LINUX-x86_64-470.86.run) $ sudo chmod  a+x ./NVIDIA-LINUX-x86_64-470.86.run $ ./NVIDIA-LINUX-x86_64-470.86.run                   or 1. $ apt-cache search nvidia-driver or $ sudo add-apt-repository ppa:graphics-drivers $ sudo apt-get update 2.  $ sudo ubuntu-drivers devices       3. install recommended $ sudo apt-get install nvidia-driver-515 4. check driver $ nvidia-smi  5. modify setting by GUI $ sudo nvidia-settings   6. GUI method installation of drivers search driver in search and apply changes by additional drivers repository       references https://blog.eldernode.com/install-development-tools-o...

Installation of Jitsi Meet Server on Ubuntu

圖片
1.open port of http/https permission use ufw allow 2. wget  https://download.jitsi.org/jitsi-key.gpg.key && sudo apt-key add jitsi-key.gpg.key 3 sudo  echo ' deb https://download.jitsi.org stable/' > /etc/apt/sources.list.d/jitsi-stable.list 4. sudo  apt update && sudo apt install jitsi-meet jigasi jicofo jitsi-videobridge curl vim     5. select self-signed if you do not have TLS certificate   6. Obtaining a certificate from Letsencrypt website sudo  add-apt-repository ppa:cerbot/cerbot && sudo apt install certbot   7.Install certbot sudo /usr/share/jitsi-meet/scripts/install-letsencrypt-cert.sh 8. Allow port from ufw command sudo ufw allow 80/tcp sudo ufw allow 443/tcp  sudo ufw allow 4443/tcp sudo ufw allow 3478/udp sudo ufw allow 10000-20000/udp sudo ufw enable  9. Add authentication for host sudo vim /etc/prosody/conf.avail/yourhost.cfg.lua authecti...

VMware cache on Ubuntu

Ubuntu拖曳至VMware或互相拖曳時,會如同複製貼上而產生快取檔案,位置在 ~/.cache/drag_and_drop 時間一久,但會愈來愈大,故可以用rm -rf 來清除裡面不要的資料夾。 故假定若Ubunt系統內檔案有遺失,亦可以從.cache 資料夾內對應的軟體名稱資料夾找, 如VMware的例子

Ubuntu 18.04 安裝 Pulse Secure VPN

圖片
1. 安裝 libwebkit-gtk sudo apt install libwebkit* 2. 安裝 pulse from app store 開啟store,搜尋 pulse 3. 執行後,點選 +,輸入ssl vpn位址,按connect,如下圖 (圖一) 參考 https://kb.pulsesecure.net/articles/Pulse_Secure_Article/KB40277/?l=en_US&fs=RelatedArticle https://docs.pulsesecure.net/WebHelp/Content/PCS/PCS_AdminGuide_8.2/Using%20Pulse%20Secure%20Linux%20UI.htm

Ubuntu 18 安裝 flash player plugin 給內建 firefox

圖片
Ubuntu內建的firefox無法正確顯示flash 物件,藉由以下網頁  https://get.adobe.com/flashplayer/about/ 得知需要安裝的版本為 NPAPI, 所以我們從以下網站下載 NPAPI 的 tar.gz 檔案,如圖一 https://get.adobe.com/flashplayer/otherversions/ (圖一) 下載後,利用指令  tar  zxvf flash_player_npapi_linux.x86_64.tar.gz 解壓縮後,接著讀 readme.txt 內容,可得知須複製 libflashplayer.so 至firefox plugin的資料夾,與複製解開之 usr資料夾底下的所有檔案至 /usr。如 cp libflashplayer.so /usr/lib/mozilla/plugins/  或  cp libflashplayer.so /usr/lib/adobe-flashplugin 以及 cp -r /usr/* /usr 接著再重啟動 firefox 瀏覽器,連結測試網址 https://get.adobe.com/flashplayer/about/ 若成功就有版本訊息! 或是 參考 https://help.ubuntu.com/stable/ubuntu-help/net-install-flash.html.en https://help.ubuntu.com/stable/ubuntu-help/addremove-sources.html.en#canonical-partner

Ubuntu Linux製作個人GnuPG簽章,來加密文件與訊息

圖片
1. 下載GnuPG   apt install gunpg 2. 產生 PG 密鑰,會詢問真實姓名與電子郵件地址(組成所謂的用戶ID),接著會詢問密碼,請輸入兩次用以確認。如圖一   gpg --gen-key   #快速產生 或   gpg --full-generate-key 3. 再產生取消的證書,以備密鑰作廢可以請求提供公鑰伺服器來取消公鑰  gpg --gen-revoke gpg --list-keys 可以顯示公鑰與私鑰 公鑰文件存在 ~/.gnupg/pubring.kbx 4. 匯出公鑰與私鑰 gpg --armor --output pub_key.crt --export user_ID    #用戶名稱公鑰 gpg --armor --output pri_key.crt --export-secret-keys user_ID  # 用戶名稱私鑰,須輸入密碼 5. 上傳公鑰至公鑰伺服器如 https://pgp.mit.edu/ https://pgp.key-server.io/ gpg --send-keys user_ID --keyserver pgp.mit.edu 可利用 gpg --fingerprint 來取得公鑰指紋並公開讓人比對公鑰伺服器提供之公鑰是否為真 6. 加密文件,先匯入對方公鑰,對方讀取僅需要他的私鑰與密碼 gpg --import myfriend_pub.crt  #可請對方發送或是從上述公鑰伺服器尋找 gpg --recipient friend_ID --output mydoc.txt.encrypt --encrypt mydoc.txt   # ID通常是 username<email> 解密可用 gpg mydoc.txt.encrypt 7. 利用個人私鑰對文件做簽章,以證明本人所發 gpg --sign mydoc.txt 若想單獨簽名文件 .sig 與內容分開放,可以用以下 gpg ---armor -detach-sign mydoc.txt 對方可利用您的公鑰,來驗...

Ubuntu Linux使用 youtube-dl 下載自己上傳的 youtube 影片

圖片
1.  apt install youtube-dl 2. CLI 方式 (man youtube-dl ) youtube-dl  "youtube_url" 3. 安裝圖形化 apt install ytd-gtk 如下圖 for CentOS yum install -y youtube-dl yum install -y ytd-gtk 參考資料 https://www.duplicate-finder.com/video-dl.html

解決 apt 出現 "you must manually run 'sudo dpkg --configure -a' to correct the problem"

圖片
1. 進入 /var/lib/dpkg/updates/ 2. 用指令 rm 刪除所有裡面之檔案,如圖 rm -rf * , 如圖 3. sudo apt upgrade 4. sudo apt update

Ubuntu Linux 安裝 notepadqq 或 atom 或 sublime Editor

# notepadqq PPA $ sudo add-apt-repository ppa:noteadqq-team/notepadqq $ sudo apt-get update $ sudo apt-get install notepaddqq 參考 https://github.com/notepadqq/notepadqq#distribution-packages # sublime 1. GPG key installation $ wget -q0 https://download.sublimetext.com/sublimehq-pub.gpg | sudo apt-key add - $ sudo apt-get install apt-transport-https $ echo "deb https://download.sublimetext.com/ apt/stable/" | sudo tee /etc/apt/sources.list.d/sublime-text.list $ sudo apt-get update $ sudo apt-get install sublime-text 參考 https://www.sublimetext.com/docs/3/linux_repositories.html # Atom 1. GPG key installation $ curl -sL https://packagecloud.io/AtomEditor/atom/gpgkey | sudo apt-key add - $ sudo sh -c 'echo "deb [arch=amd64] https://packagecloud.io/AtomEditor/atom/any/ any main" > /etc/apt/sources.list.d/atom.list $ sudo apt-get update 參考 https://flight-manual.atom.io/getting-started/sections/installing-atom/

ubuntu linux 取消 secure boot

圖片
有些Notebook使用EFI boot 則無法停用efi secure boot ,若無法停止BIOS的secure boot,可能會在 ubuntu linux 下讓 vmware (vmmon or vmnet) 或 virtualbox (vboxdrv )無法啟動,首先要安裝 mokutils,來控制 secure boot 的 key 與設定。 1. $ sudo apt install mokutil  2.  $ moktuil --disable-validation 3.利用 efibootmgr 開啟 efi 開機的控制畫面約5秒鐘     $ efibootmgr --timeout 5 4. 重開機後 在 Shim UEFI key management 選擇 Change  secure boot State -> 取消 secure boot 即可(如圖一)       (圖一) 5. 接著 sudo modprobe vboxdrv 與 sudo modprobe vmmon 指令,就會有作用,而不是出現key pair 不符合的錯誤訊息 若須設定 efi secure boot key $ openssl req -new -x509 -days 36500  -newkey rsa:2048 -keyout MOK.priv -outform DER -out MOK.der  -subj  "/CN=VMware/" $ sudo /usr/src/linux-headers-\`uname -r\`/scripts/sign-file sha256 ./MOK.priv ./MOK.der $(modinfo -n vmmon) $ sudo /usr/src/linux-headers-\`uname -r\`/scripts/sign-file sha256 ./MOK.priv ./MOK.der $(modinfo -n vmnet) $  sudo mokutil --import MOK.der ...