發表文章

cat /var/log/secure and grep patter on CentOS Linux

圖片
1. change to root $ su - 2. grep pattern to authntication failure login user root $ cat /var/log/secure | grep -E 'authenctication failure.*rhost=.*user=root'             # AND  syntax 3. grep pattern  for OR syntax $ cat /var/log/secure | grep -E 'authentication failure|user=root'

Installing AnyDesk / Teamviewer on CentOS 8

圖片
@AnyDesk  1. Download from http://rpm.anydesk.com/rhel/8/x86_64/Packages/ $ wget  http://rpm.anydesk.com/rhel/8/x86_64/Packages/anydesk-6.1.1-1.el8.x86_64.rpm 2. Download required library of minizip from  https://download-ib01.fedoraproject.org/pub/epel/8/Everything/x86_64   $ wget https://download-ib01.fedoraproject.org/pub/epel/8/Everything/x86_64/Packages/m/minizip1.2-1.2.11-24.el8.x86_64.rpm   3. Installed by rpm $ su - $ rpm -ivh minizip1.2-1.2.11-24.el8.x86_64.rpm    @ Teamviewer 1. Download from https://download.teamviewer.com/download/linux/teamviewer.x86_64.rpm $ wget  https://download.teamviewer.com/download/linux/teamviewer.x86_64.rpm 2.Installed by dnf $ dnf install teamviewer.x86_64.rpm Refereces http://rpm.anydesk.com/howto.html https://www.teamviewer.com/tw/download/linux/

Fortigate 80E VPN service version 6.2.4

圖片
 1. System -> Feature Visibility 2. User&Device -> User Definition -> Add Usern -> Local User -> Account and Password pair -> contact information 3. User&Device -> User Group -> Type Firewall 4. VPN -> SSL-VPN Portals enable Limit Users to One-SSL-VPN Connection at a time disable Split Tunneling 5.VPN -> SSL-VPN Setting  Authentication/Portal mapping -> add tunnel-access for your VPN GROUP 6. Policy&Objects -> IPv4 Policy Caution:   Incoming Interface -> SSL-VPN tunnel interface Outgoing Interface -> wan1 Source -> SSLVPN_TUNNEL_ADDR1                 YOUR GROUP Destination ->  all Service -> ALL_TCP Action -> ACCEPT Enable NAT references https://docs.fortinet.com/product/fortigate/6.2

Automatic forwarding email on Linux/Unix

 1. login your account  from ssh connection with mail server $ touch ~/.forward $ echo 'account@forwarding.mail' >> ~/.forward $ chmod 644 ~/.forward   2. Other account at the same server $ su -    # change to root $ echo 'fromaccount: otheraccount' >> /etc/alias $ newaliases References https://unix.stackexchange.com/questions/301310/how-can-i-automatically-forward-system-mail  https://kb.iu.edu/d/aeur  

Windows 10 professional / enterprise 版本之遠端桌面連線,在家工作遠端連線

圖片
 1. 使用搜尋->輸入遠端桌面,找到如下圖開啟遠端桌面設定程式                     2. 點選啟用遠端桌面,並設定可存取此電腦的使用者帳戶,請記得帳戶要設定密碼                                 3.本遠端桌面連線方式適合用固定IP機器,或有設定IP forwarding 的被連線主機上,以下確認帳號密碼方式: 先搜尋  控制台 字串-> 使用者帳戶 -> 使用者帳戶 -> 管理帳戶 -> 變更帳戶 ,選擇建立密碼即可建立該帳號密碼   4.家裡電腦端,搜尋遠端桌面app,如下圖,執行後,再輸入欲連線的電腦(為辦公室電腦IP)跟辦公室登入帳號即可。 其他連線軟體方式, 可適用非固定式IP被連線主機 Anydesk https://anydesk.com/en 說明  https://support.anydesk.com/Help_Center Teamviewer https://www.teamviewer.com/tw/info/free-for-personal-use/ https://www.teamviewer.com/tw/download/previous-versions/ 請下載 portable 版本爲佳 說明 https://www.teamviewer.com/en/videos/ https://www.teamviewer.com/en/documents/   Google Remote Desktop https://remotedesktop.google.com/?hl=zh-TW&pli=1  https://chrome.google.com/webstore/detail/chrome-remote-desktop/inomeogfingihgjfjlpeplalcfajhgai?hl=zh-tw&skip_c...

Change Serial Number on MS Windows 7/ 8/ 10

Please connect internet before activation  1. search -> cmd.exe -> run as administrator 2. slmgr.vbs /ipk W6ABC-X7EDF-Y8GHI-Z9JKL-A0MNO   # example of SerialNumber 3. slmgr.vbs /ato p.s. To extend trial time span slmgr.vbs /rearm References https://docs.microsoft.com/zh-tw/windows-server/get-started/activation-slmgr-vbs-options

Read files and list them with natural sorting in PHP

 <?php   $file_arr = array();  $dd = dir('uploads');   // files in this relative path   while ( $file = $d->read())  != false ) {        if(strlen($file)>2) {   // ./ and ../ is exceptional           $file_arr[]=$file;        }    }  $d->close();   // close file ptr sort($file_arr,SORT_NATURAL);   // or  natsort($file_arr); $i=1; foreach ($file_arr as  $sf){   echo $i.". ".$sf."<br>"; }   // print all sorted files ?> References https://www.php.net/manual/en/function.sort.php  https://www.php.net/manual/en/function.natsort.php  https://www.php.net/manual/en/function.natcasesort.php

nothing provides libfluidsynth.so.1()(64bit) needed by vlc-1:3.0.12-1.el8.x86_64 on CentOS 8

圖片
 1. download libfluidsynth libfluidsynth1-1.1.11-14.1.x86_64.rpm packages for Fedora 26 from  ftp://ftp.pbone.net/mirror/ftp5.gwdg.de/pub/opensuse/repositories/home:/rncbc/Fedora_26/x86_64/libfluidsynth1-1.1.11-14.1.x86_64.rpm or http://rpm.pbone.net/info_idpl_61486622_distro_redhatel8_com_fluidsynth-libs-1.1.11-6.el8.x86_64.rpm.html  2. Install package with rpm -ivh $ su - $ rpm -ivh libfluidsynth1-1.1.11-14.1.x86_64.rpm $ dnf install vlc      #as refernce URL Reference https://www.videolan.org/vlc/download-redhat.html

Download and use CUDA repo on CentOS 8

 1.  open broser and go to https://developer.download.nvidia.com/compute/cuda/repos/rhel8/x86_64/cuda-rhel8.repo or download https://developer.download.nvidia.com/compute/cuda/repos/rhel8/x86_64/cuda-repo-rhel8-10.1.243-1.x86_64.rpm 2.  $ su - $ cp cuda-rhel8.repo /etc/yum.repos.d/ or $ rpm -ivh cuda-repo-rhel8-10.1.243-1.x86_64.rpm 3.  $ dnf update References https://developer.download.nvidia.com/compute/cuda/repos/rhel8/x86_64/

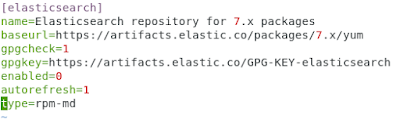
Installing Elasticsearch, Logstash, Kibana, Filebeat on CentOS 7

圖片
1. change to root $ su - 2. download and install the public signing key: $ rpm --import https://artifacts.elastic.co/GPG-KEY-elasticsearch 3. produce .repo files inorder to downlowd from YUM $ touch /etc/yum.repos.d/elasticsearch.repo $ vim /etc/yum.repos.d/elasticsearch.repo             4. produce .repo files inorder to downlowd from YUM $ touch /etc/yum.repos.d/logstash.repo $ vim /etc/yum.repos.d/logstash.repo              5. Such as step 4 to edit /etc/yum.repos.d/kibana.repo 6. build as step 4 to edit /etc/yum.repos.d/elastic.repo also 7. yum install elasticsearch logstash kibana filebeat 8. systemctl enable elasticsearch.service     systemctl enable kibana.service     systemctl enable filebeat.service 9. systemctl restart elasticsearch.service     systemctl restart kibana.service     systemctl restart filebeat.service 10. firewall-cmd --permanent --add-port...